How To Refinish Hardwood Floors
Refinishing your hardwood flooring is not as difficult as it may sound. Follow the handful of simple steps I have outlined and save yourself a whole lot of money. OH YES YOU CAN….so Let’s Fix It Up!
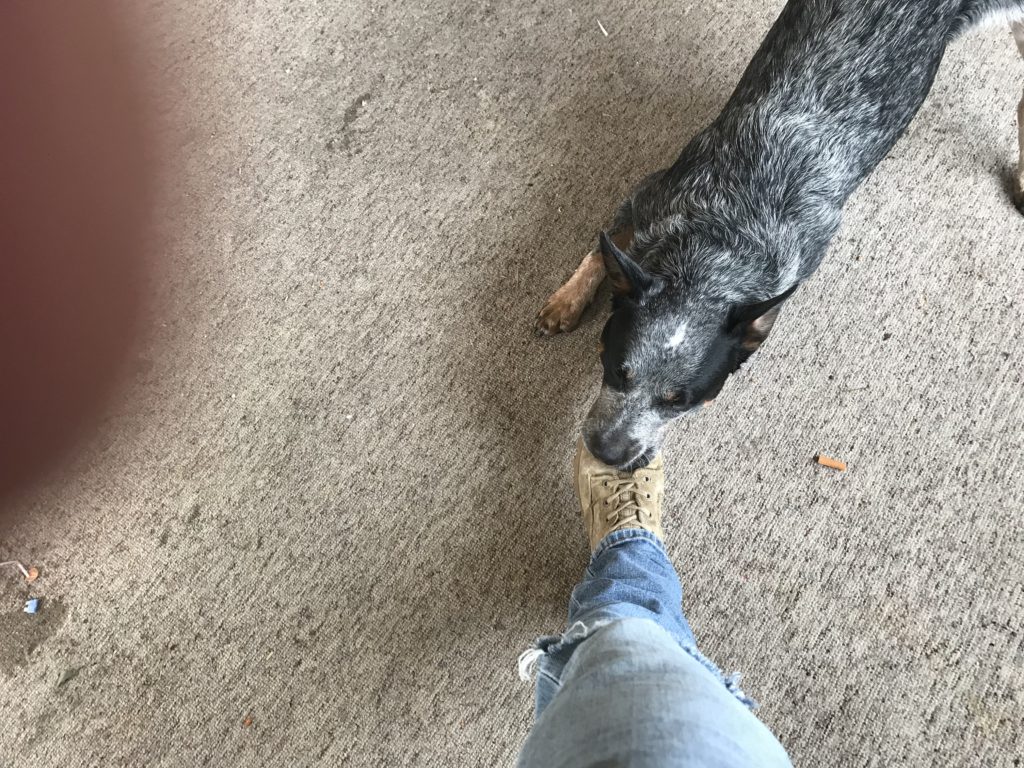
It was so fortunate to discover that 10 of the 13 apartments I recently purchased had White Oak hardwood flooring! Each one of these apartment floors was shamefully covered in old mite infested, rotting, grime filled carpeting. The discovery was amazing and the process to restore them to their former luxurious finish was not that overwhelming or difficult. So with my helper and team mascot, let’s get started:
Equipment and materials you will need
- Hardwood Floor Sander (~$50-$80/day)
- Sand Paper- 60 Grit for initial sanding and 100 grit for second sanding. Each belt of sandpaper will sand approx. 100 square feet of flooring, so purchase according to your floors size. Each belt will cost around $$8-$10, most Home Centers will refund your money on any unused sandpaper.
- Orbital or Palm Sander (to sand around the edges and in hard to reach areas) DeWalt Brand Palm sander are a great tool and cost about $50.
- A sleeve of 60 grit and a sleeve of 100-120 grit sandpaper for the Orbital Sander.
- Mop or swifer
- A bucket of “Woodwise Full-Trowel wood filler” (1 gallon covers around 250 square feet of flooring)
- Bona clear wood sealer (1 gallon covers up to 350 square feet of flooring)
- Bona clear wood finish (1 gallon covers up to 350 square feet)
- Sealer and Finish Applicator
- Paint rolling pole
Table could not be displayed.
Preparing The Floors
Carpet Removal Process
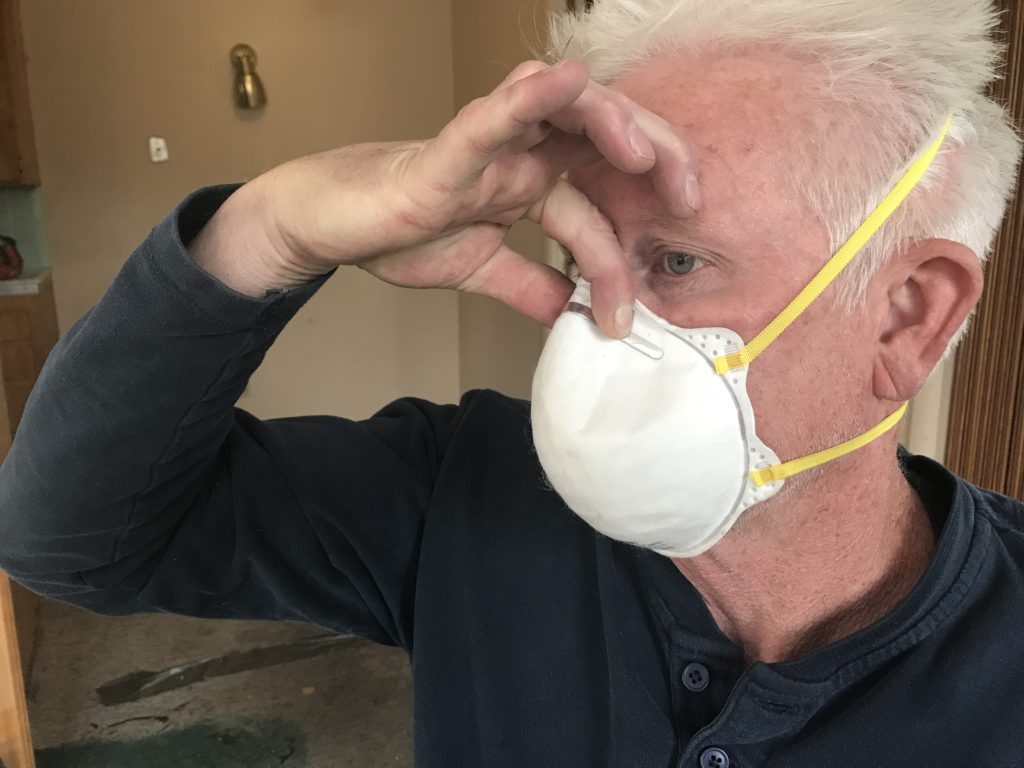
First things first, wear a dust mask! Carpeting contains all manners of allergens and dust, I do not care to even imaging what else.When refinishing Hardwood Flooring you will be wearing a dust mask throughout the entire process, buy a large box of them and change them often to avoid any problems. Simply place the mask over your head and pinch the nose to create a good seal. No project nor any amount of money is worth your health. Health is priceless, please protect it.
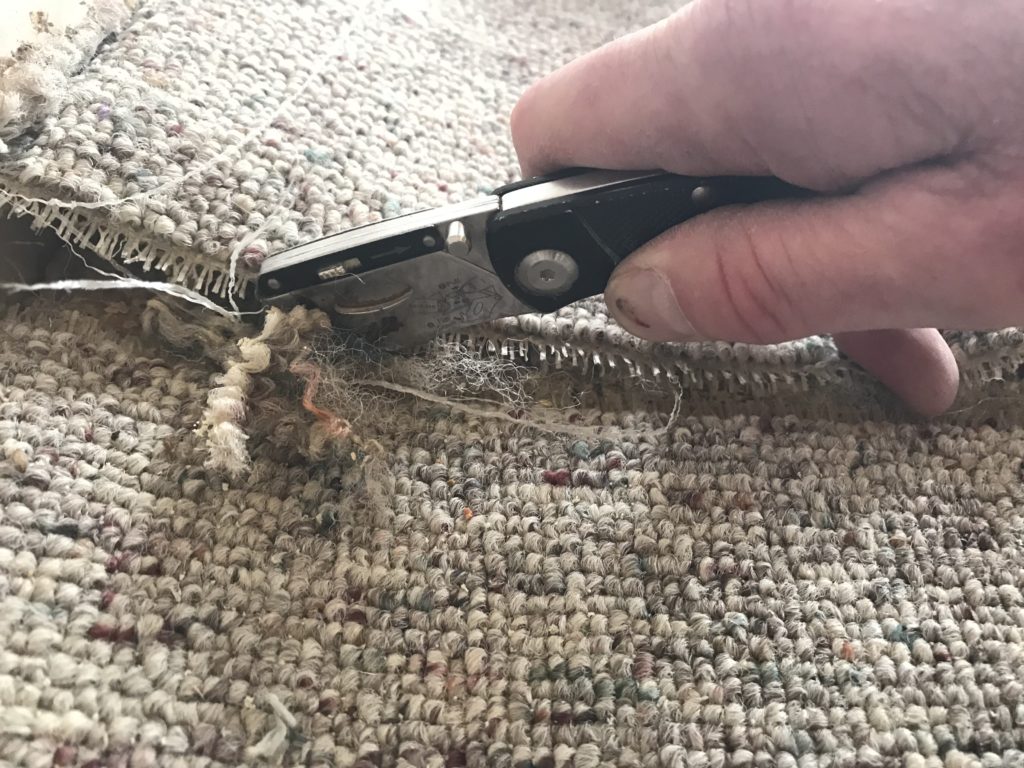
Using a razor knife, cut through the carpeting and pad. Carpeting is extremely heavy, especially old, soiled and filthy carpeting. Years of dirt build-up only add to the weight. Our purpose is to cut the carpeting and pad into small manageable sections for ease of handling and disposal. (cut carpeting in approximately 8′ x 8′ sections) Even with a sharp razor, a fair amount of pressure is needed to cut through the carpeting, take care not to apply so much pressure that it causes any additional damage to what likely will be an already marred floor.
There was a period of time, 1970’s through the turn of the new millennium, that everything had to be carpeted. I guess I kind of get that, carpeting offered a level of comfort that you just don’t get with hard surfaces. The biggest problem is however, that carpeting is next to impossible to keep clean. Carpeting contains allergens that are simply unhealthy, it quickly can become unsightly and smelly due to spills and animal messes and it needs to be replace all to often.

Removal of Tack-Strip, Nails, Screws and Staples
After the removal of all the carpeting and pad, it is a good idea to sweep and then run a Shop-Vac over the entire wood floor. Our next step will be the removal of all tack-strip, nails screws and staples that will be present in the flooring, working in a debris free, cleaner environment allows for increased visibility during our removal process. Failure to identify and remove even the smallest of these metal pieces will result in torn sandpaper and a fair amount of frustration and expense.
A square mouth shovel or pry-bar works nicely to remove the majority of the Tack-Strip in addition to many of the nails and staples that will be present in the body of the flooring. Simply wedge the end of the shovel or pry-bar under the tack and lever the handle downward effectively popping the tack from the floor. Be very careful not to scar the flooring during this process, as it will increase the repair workload and result in a overall inferior finished product. The shovel and/or pry-bar will not remove all of the nails and staples, so, the next step will be on hands and knees, scouring the entirety of the floor looking for any remaining nails, staples and in some cases screws. Using a finish hammer a high quality pair of nettle-nose pliers and a screw gun we complete the removal process, taking care once again not to damage the flooring ALWAYS wear safety googles during this removal process as splinters of nail filled wood may uncontrollably fly in any and all direction. Losing an eye is not worth a finished hardwood floor! And again, please wear a dust mask. Following this process it will once again be necessary to sweep and Shop-Vac the floor, leaving it clean and debris free while working the surface.
Sanding the Floor
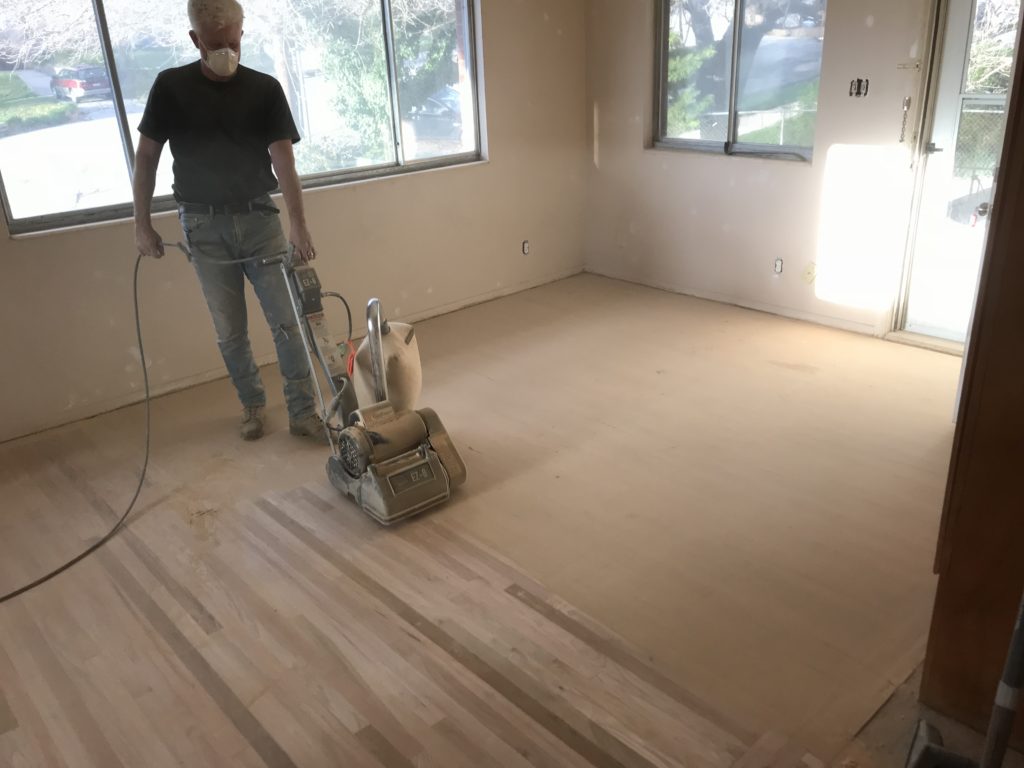
If you are like most people (including me), you do not own an industrial hardwood floor sander. The good news is, most of the equipment rental centers, as well as the larger Home Improvement stores have them for rent, you can expect to pay anywhere from about $50-$80/day to rent one. As part of the Sander rental, it will be necessary to purchase the belt sandpaper that is installed onto the machine sanding drum.
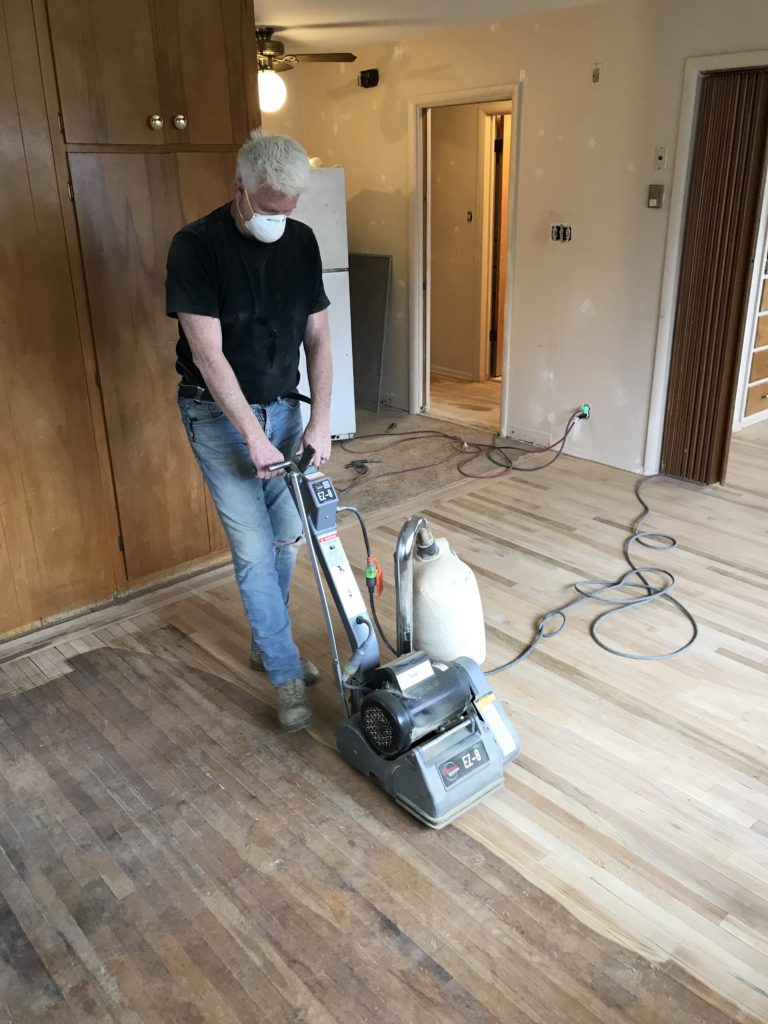
Sanding the floor with this stand up, rented industrial sander is not hard, let the machine do the work for you. The sander has a lever that engages the drum that then makes contact with the floor, the important key here is to begin moving the sander toward or away from you prior to engaging the drum. NEVER engage the drum sander when the machine is not in motion as this will cause divots in the hardwood. At the beginning and end of each pass or length of floor only engage the drum following the movement of the sander and disengage prior to stopping the moving motion. It is also very important to make sure that you are always sanding WITH the grain of the wood and not against it. If care is taken in this way then no gouging, marring or divoting will occur, resulting in a smooth, even finish. As you can see from this photo, the edges of the flooring has previously been sanded with the hand or orbital sander.
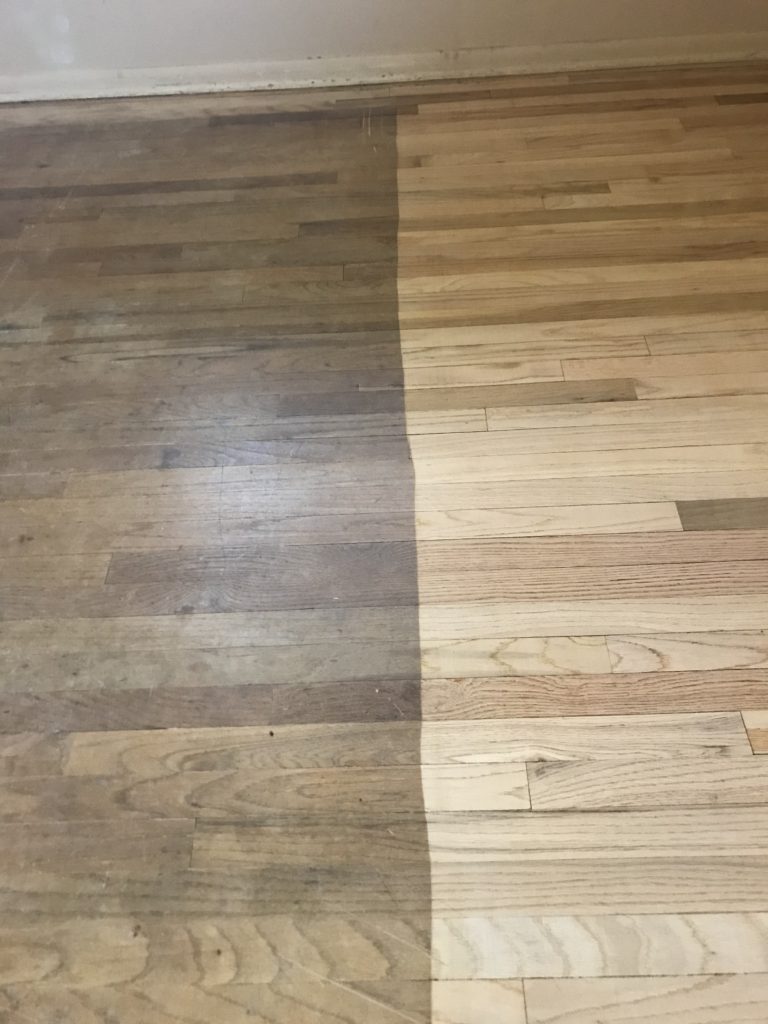
As you can see, the result following the initial sanding is pretty dramatic! Once you have completed sanding the entirety of the Hardwood Flooring, sweep and then vacuum the dust from the flooring. Next, repeat the process with the 100 -120 grit sandpaper, this will leave a very nice finish that feels and looks great. Again, once you have completed the second sanding, sweep and vacuum to remove all dust.
Fillling in the Gaps with Wood Filler
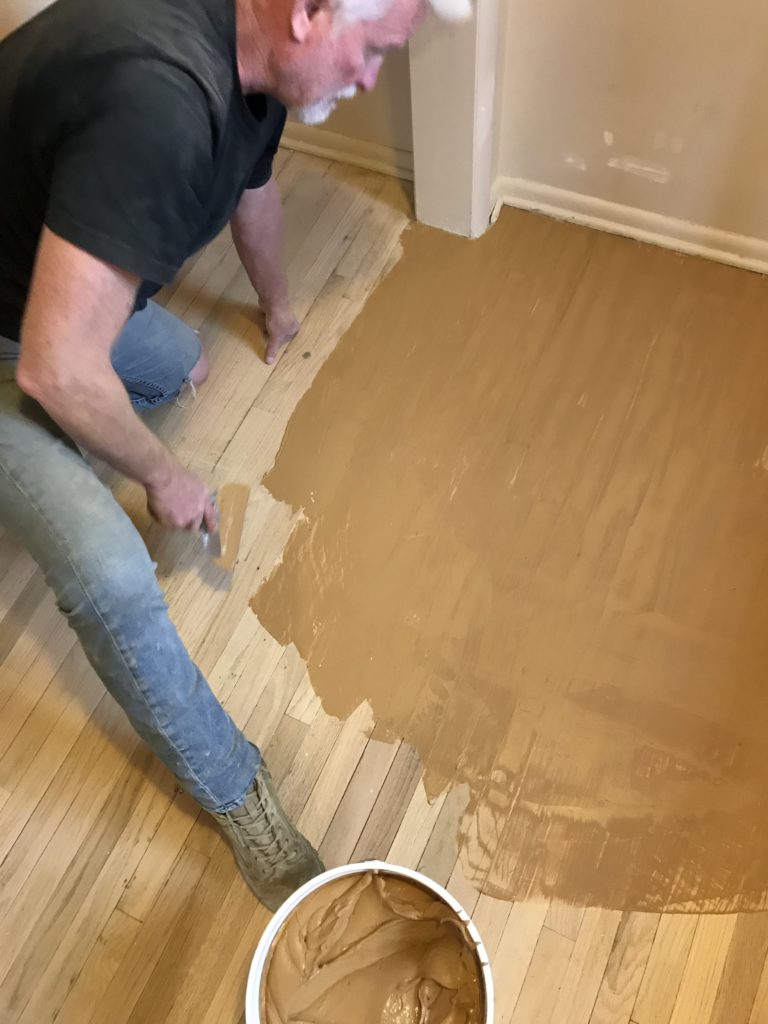
As noted earlier, and as you can see in this photo, the gaps between each board is significant. Using a trowel (I actually prefer a large drywall knife), and beginning in the furthest corner from a doorway exit, start to trowel the floor with the WOODWISE wood-filler. The filler goes on very smooth and is easily managed, and although not of critical importance, try to apply the filler at a 45 degree angle to the gaps in the flooring as you spread it across the surface (much like grouting tile) leaving as little excess material as possible to help minimize the sanding requirements, in addition to saving on material. The drying time for the filler is actually quite short (2-3 hours), under normal conditions 65 – 80 degrees, however, if the holes and gaps in the floor are large the drying time can increase to as much as 24 hours. The filler does tend to shrink some in larger holes and gaps as well, so under these conditions, a second application may be and the drying time could be as long as 36 hours before we can begin sanding the filler. NOTE: make sure the filler that you select is the right color to match the type of wood that your floor is made of, or, in the case of staining your floor, make certain that the filler matches the stain color.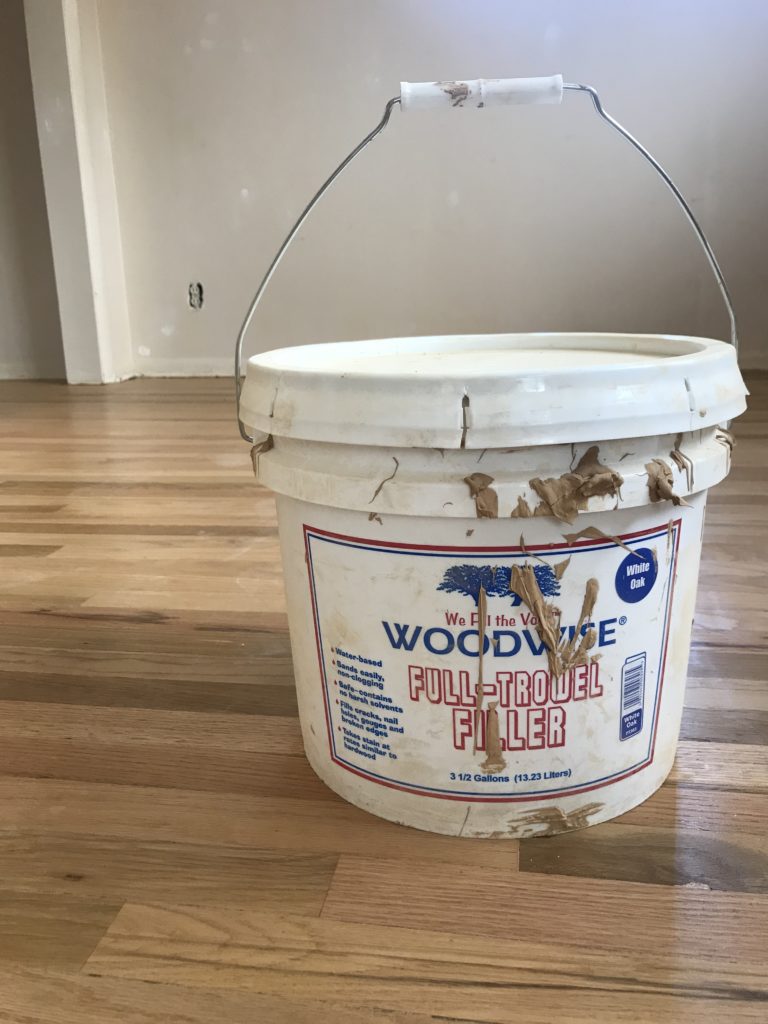
Once the Woodwise filler has dried, utilizing the Floor Sander and 100 – 120 grit sandpaper, we once again sand the entirety of the floor, taking care to always make sure the sander is in motion when engaging the sanding belt and that the belt is disengaged prior to stopping the sanders movement. The filler sands quite easily and will not take the time and effort that was necessary for the initial sanding.
All cracks, holes and divots are now nicely filled in and match the woods natural color. It is amazing how the floor now really comes to life! Using the DeWalt or other Orbital sander and 100-120 grit sheet sandpaper, sand around all edges and any areas that the large belt sander could not reach. (Knee Pads are a great idea). NOTE: if as part of your renovation and floor refinishing, you are also planning on painting the walls and ceiling, I always like to run the orbital sander along the baseboards for a nicer paint finish. Basically, if you are already down there, why not?

Side-note: Preparing the Walls for Paint
As a continuation of the thought above as it relates to painting. More often then not, when refinishing your hardwood flooring, it is also part of the plan to paint the same room when the refinishing of the floor is complete. I like to consider the refinishing of the Flooring and the Painting as one big process, in this way, I can plan my steps (process) to help make both tasks easier and more efficient. When doing both tasks I undertake them in the following order;
- Complete all drywall repair to include sanding
- Spackle and sand all holes, divots and dings in walls, ceilings and trim.
- Clean up all drywall and Spackle dust prior to floors initial sanding.
- Complete initial floor sanding, wood filler process, sanding of wood filler and wood flooring sealer application.
- Once the sealer is dry, I will complete the painting process utilizing drop cloths to protect the flooring.
- Following the completion of painting, make sure all paint spills and other debris is completely removed from flooring
- Complete the finish coat applications of floors.
I complete these two tasks in this way due to the mess that painting invariably causes. The drywall and Spackle dust gets everywhere and it may as well get cleaned up right along with the dust from the floor sanding, this also prevents this dust from getting on your finished floor product. Secondly, as careful as one might be while painting, spills always occur. When spills occur and there is no sealer coat or protection on the flooring the paint can easily seep into the wood, making its removal extremely difficult. If the floor refinishing is completed after the painting, then you will find that dust will settle on all your freshly painted walls and even on the ceiling. Following this process, will e;eliminate a lot of hard unnecessary work and make for a better finished product not only for your floors, but the painting as well.
Final Steps: Cleaning & Applying Refinish
Cleaning the Floors Before Refinishing
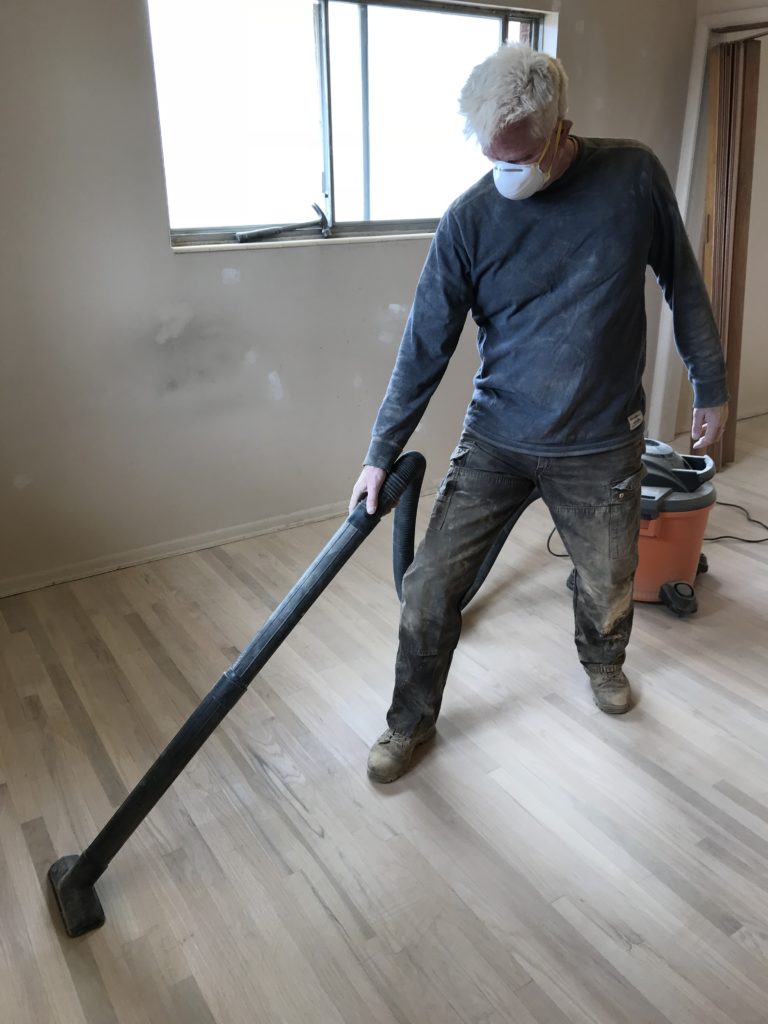
Now that the floors have all been sanded following the application of the wood filler, its time to really clean the floors and walls of all dust. The process that I found to work best, is to sweep first, this gets the vast majority of dust of the floors and walls (yes I give the walls a sweep down). The dust settle’s everywhere! Even the very best of sanders and attempts at covering simply do not capture all the dust. Thoroughly vacuum floors, walls, shelving and any other place you can think of, (we are about to apply the sealer and do not want to seal any dust in). Once I have vacuumed thoroughly I vacuum again, I then take a damp mop (rinsing it out often) and go over the entire floor surface to get any residual dust that may be stuck to the floor.
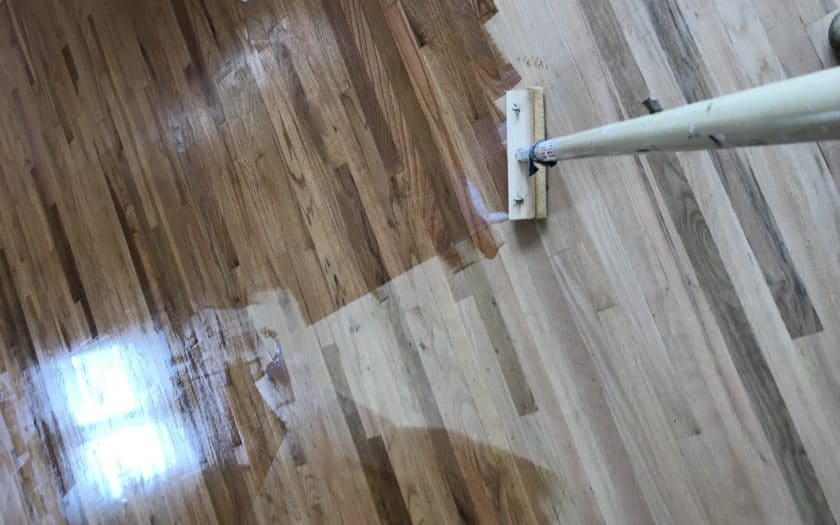
Applying Sealer and Final Finish
With a foam and cloth applicator and a rolling pole it is time to apply the sealer to our now very clean and dust free Hardwood Flooring. Starting on the furthest area from our exit, (don’t forget to plan an exit strategy or pattern of application that won’t paint you into a corner, but allows for an easy exit). Dampen the applicator with water, using “BONA” Brand Intense Seal, simply pour the sealer onto the floor in even lines extending about 6 feet wide at a time. Begin spreading the sealer around the floor with easy smooth, long strokes, making every effort to to leave areas of pooling sealer. (Spread liberally, but evenly to avoid pooling) Note: leave a couple of windows cracked prior to sealer and finish coat applications to allow for better air circulation to facilitate drying process and to reduce odors.
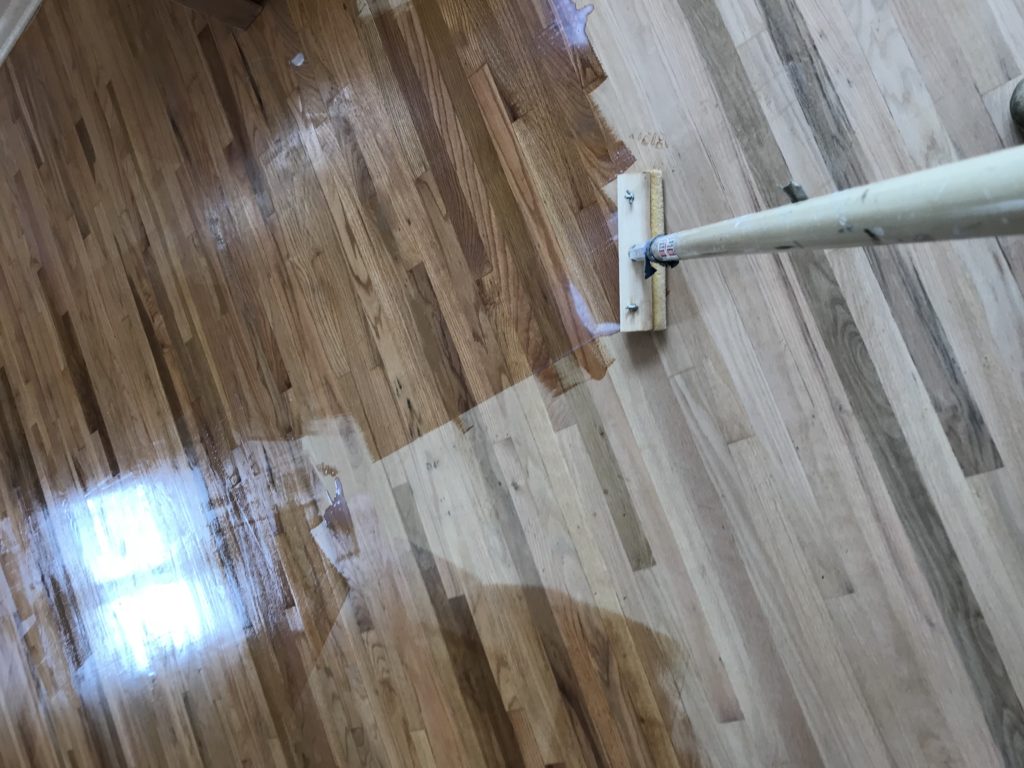
Both the sealer and the finish product are water based products so they will dry quickly and you can wash yourself and your equipment with water. Once you are finished you should allow the sealer to dry for a minimum of 24 hours, although under normal conditions 60 + degrees it should dry to the touch in a couple of hours. Once the sealer has been allowed to dry for 24 hours we can prepare to apply the first coat of our finish product. With a drywall pole-sander head and using 120 grit mesh drywall sandpaper, sand the entire hardwood floor vigorously, (utilizing a paint rolling pole and drywall sanding head). The idea is to loosen any grit that might have risen and hardened when the sealer was applied, allowing for a very nice, smooth surface when the finish coats are applied.
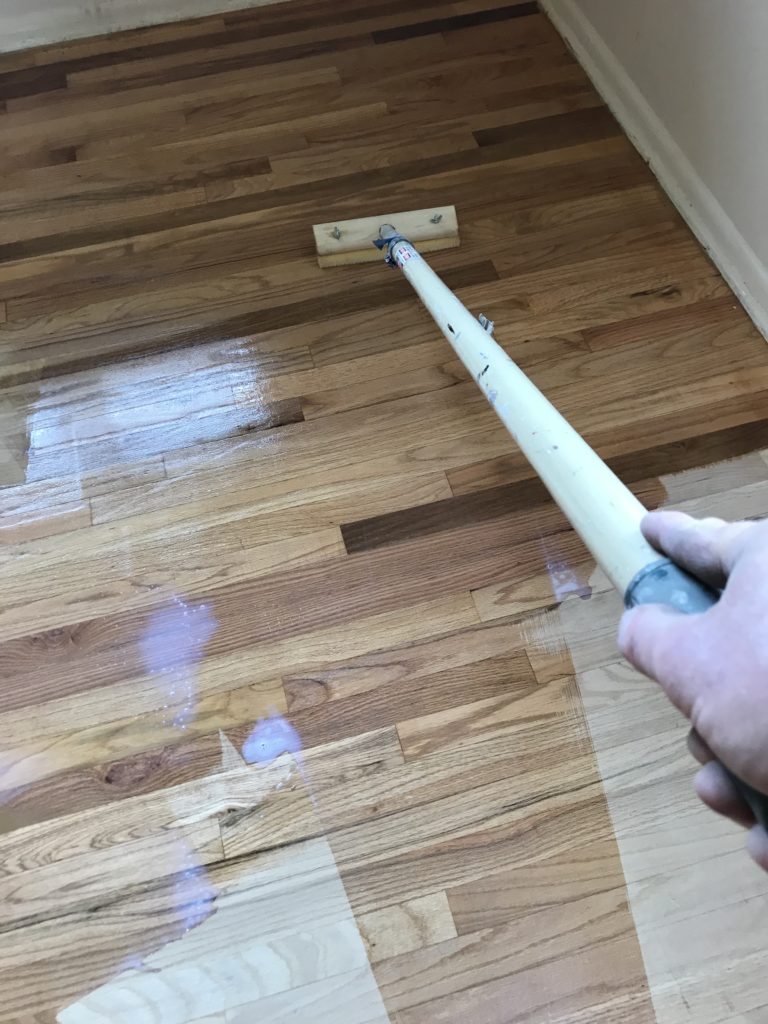
Sweep, vacuum and mop thoroughly following the sealer sanding, just as performed prior to the sealer application. Take special care to remove as much dust and residue as possible, I like to run over the floor with a “Swifer” or other sweeper that has a sticky head, before the finish coat application. This quite effectively removes 99.9 percent of any residue. Just as applied with the Sealer, repeat the same process with the “Pallmann” PALL-X Finish product. My personal preference is the Satin finish as I do not like my floors to shiny. Repeat the process of sanding with a drywall sanding head, cleaning and application for a minimum of two finish coat applications.
This is how you refinish your old Hardwood Flooring. If you follow these steps then you will have beautifully restored flooring that you will be happy with for many, many years to come.
Steve is a skilled craftsman & DIY expert – with years of general contracting and real estate development experience, Steve founded LetsFixItUp.com as an authoritative resource for home renovation, design and DIY projects.
✅ How much would it cost to refinish hardwood floors?
Much less if you do it yourself!
✅ Can you refinish painted hardwood floors?
That depends on how many times the has been painted and how deeply the paint penetrated the wood. If you have a thick layer of hardwood, you can sand down below the paint. If it has been refinished many times in the past, your hardwood will be thinner and you may trouble sanding it down enough for a quality refinish.
✅ Is it worth it to DIY refinish hardwood floors?
Hiring a professional can provide better results, but if you're determined and meticulous, it can be done yourself!
This is truly useful, thanks.
Thanks for the wonderful guide
Thank you Roxana, I am so glad that you found it helpful!
I pulled a strip of my old green shag carpet up and to my surprise, unfinished? oak floors! I’ll probably be able to skip the sander? I’m excited to get started. Thanks a lot Jessie.
Hi Larry,
In the 40’s and 50’s in many municipalities, cities and so forth, hardwood flooring was a specified requirement. The contractor would often install the hardwood unfinished and then just cover it with carpeting as a cost saving measure. Although I cannot see your specific floor, chances are pretty high that sanding will be necessary. Best of luck Larry, it will definitely be worth the effort! – Jessie James